How were your burgers? Good right? I know.
I suppose with my last post I opened to the door to the deck
or patio where the BBQ is kept and I should keep going in that direction with
the blog for another post or two. Works for me, I love my BBQ. I think for this
entry I’m going to go the direction of tips and tricks for keeping your BBQ
functional and for a few different recipes.

First, the BBQ itself. Keep it clean. That isn’t as easy as
it seems since it is kept outdoors in the elements, probably year round. In the
spirit of that, keep it covered when it isn’t in use. BBQ covers are fairly
cheap and come in a wide variety of styles and materials. Choose what works
best for you and go with it. Even with a cover you’re going to get dust and
pollen and whatnot on the outside of the BBQ but that is easy to wipe off if
needed.
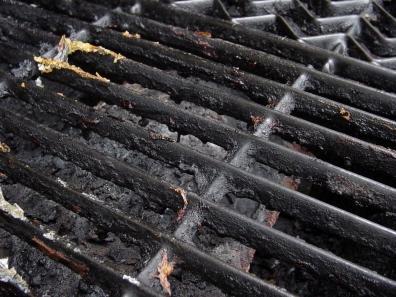

 A lot of people don’t clean the internals of their grill as
often as they should. Now I’m talking gas grills here and not charcoal, which
are a whole different animal that I don’t like using because I want my steak to
taste like steak and not an ashtray filled with lighter fluid. Getting back to
the internals; the grill top is self explanatory. Everyone has a wire brush
that they brush off the burnt bits with when they are done. Easy as pie right?
Well now you need to deal with those burnt bits that just fell into the body of
the BBQ. Those bits get down on the heat shields and light on fire and actually
end up burning holes through the shields which cause hot spots on your grill
top. I personally shop-vac the crud out of the bottom of my BBQ every couple of
weeks or so to keep it functioning well. Other than that, check your burners
regularly to ensure you are getting flame from them from one end to another.
They do wear out and they do plug off from time to time which will also cause
hot and cold spots on your grill top. Replacement burners are available at many
retailers if needed so don’t think you have to buy a new grill because your
burner crapped out. Twice a year I also take my grill racks and burner covers out of the BBQ entirely and pressure wash them to clean them completely. That way you can inspect them and see if it is time to replace them. Yes they can be bought at many retailers as well.
A lot of people don’t clean the internals of their grill as
often as they should. Now I’m talking gas grills here and not charcoal, which
are a whole different animal that I don’t like using because I want my steak to
taste like steak and not an ashtray filled with lighter fluid. Getting back to
the internals; the grill top is self explanatory. Everyone has a wire brush
that they brush off the burnt bits with when they are done. Easy as pie right?
Well now you need to deal with those burnt bits that just fell into the body of
the BBQ. Those bits get down on the heat shields and light on fire and actually
end up burning holes through the shields which cause hot spots on your grill
top. I personally shop-vac the crud out of the bottom of my BBQ every couple of
weeks or so to keep it functioning well. Other than that, check your burners
regularly to ensure you are getting flame from them from one end to another.
They do wear out and they do plug off from time to time which will also cause
hot and cold spots on your grill top. Replacement burners are available at many
retailers if needed so don’t think you have to buy a new grill because your
burner crapped out. Twice a year I also take my grill racks and burner covers out of the BBQ entirely and pressure wash them to clean them completely. That way you can inspect them and see if it is time to replace them. Yes they can be bought at many retailers as well.
Wow this is exciting stuff. Lets get to the food. Here are a
few tips and tricks I use for some of my favorite grilled foods.

Steak/Chops – I have one side of my grill screaming hot and
the other on medium to medium-high. That way I can give the outside of the
steak/chops a good sear for 2 minutes a side and then move it to the lower heat
instead of turning down the one side and letting the steaks/chops get the
higher heat for a longer time which in the end can get them overcooked. DO NOT
cut the steaks/chops to see how done they are, this will let the juices out and
dry out the meat. Once they are cooked, let them rest for a few minutes. I
cannot stress that enough. Let the juices reabsorb into the meat before you cut
it.

Roast – Yes that says roast, as in beef or pork. I rotisserie
my roasts but first I get one side of my BBQ screaming hot and do a couple
minute sear on each side of the roast to seal in the juices. Now I have a 3 burner set up for my BBQ so I
position the roast in the center and use indirect heat from either side. Put a
“drip pan” under the roast to catch any juices that fall from the it as it
cooks and put a bit of water in the pan at the start to keep those juices from
burning to the pan when they fall. Those juices go fantastic in gravy. I
actually marinade my roasts overnight the night before and then put what is
left of the marinade under the roast and use the marinade and juices together
in the grave. Again, once it is cooked, let it rest before you cut it.
Beercan chicken – Two quick tips. First, use indirect heat to keep the skin from burning and second, resist the urge to lift the lid and check the thing. Lifting the lid lets the heat out and food that isn’t directly on the grill top needs the heat that is in the space above the grill to cook properly. Figure out your cooking time and follow it.
 Skewers/Kebabs – I like to marinade the meats on my kebabs
overnight before I skewer them. You can add ridiculous amounts of flavor by
doing that. Alternate meats and veggies when skewering to let the flavors mix
with each other as they cook. Kebabs are famous for sticking to the grill top
so I got a set of metal holders that keep the skewers about an inch above the
actual grill and prevent this. I love using them and recommend them to anyone
who wants to make delicious kebabs.
Skewers/Kebabs – I like to marinade the meats on my kebabs
overnight before I skewer them. You can add ridiculous amounts of flavor by
doing that. Alternate meats and veggies when skewering to let the flavors mix
with each other as they cook. Kebabs are famous for sticking to the grill top
so I got a set of metal holders that keep the skewers about an inch above the
actual grill and prevent this. I love using them and recommend them to anyone
who wants to make delicious kebabs. 
Fish – The main tip for grilling fish is be aware of how
fast it cooks. Fish is done in the blink of an eye so look up cooking times and
follow them closely.
Potatoes – Ah spuds, so good when done properly. When I make
potatoes on the grill I slice them thin (and anything else I am putting in with them)
and wrap them in foil with some olive oil and spices and put them on the grill. The tip is
to flip them often or they will burn to the foil.
I think that’s enough for now. Going simple on the recipe
this time.
Dogg’s Garlic Aioli
Ingredients:
2 egg yolks, room temperature 9 cloves of garlic, as
finely minced as you can
1 tsp Dijon
mustard
2 tsp lemon juice
½ cup olive oil ½ cup sunflower (or lighter
vegetable) oil
Directions:
- Add the egg yolks, garlic, mustard and lemon juice to food processor and blend until smooth
- With the food processor running, VERY slowly drizzle the olive oil into the mixture. This can take up to 5 minutes. Seriously, that slowly. If need be stop the food processor to scrape the sides.
- Repeat step 2 but with the sunflower oil. The mixture should “whip up” as you do it.
- When done put in an airtight container in the fridge and let the flavors come together for a few hours before you eat.

No comments:
Post a Comment